When planning an LED video wall, one of the most critical decisions is the pixel density — more specifically, choosing the right pixel pitch for LED video walls. Pixel pitch determines how closely each LED—or “pixel”—is spaced to its neighbor, and this distance has a direct impact on resolution, viewing distance, cost, and overall performance. In this guide, we’ll walk through all relevant factors, trade-offs, and best practices to help you make an informed decision.
What Is Pixel Pitch, and Why Does It Matter?
Pixel pitch is typically measured in millimeters and denotes the distance from the center of one LED to the center of the next LED in the display matrix. The notation is often like “P2.5” meaning 2.5 mm. A smaller pixel pitch means LEDs are more tightly packed; a larger pitch means greater separation and thus fewer pixels per unit area.
This spacing directly influences image clarity: when your audience is too close, a coarse pixel pitch can make individual LEDs visible (i.e. “pixelation”). Conversely, if you use an ultra-fine pitch but viewers are far away, you may not actually see the benefit (but you’ll still pay the cost). Thus, choosing the right pixel pitch for LED video walls is all about matching pixel density to viewing conditions, content type, budget, and installation constraints.
The Fundamental Relationship: Pixel Pitch ↔ Viewing Distance
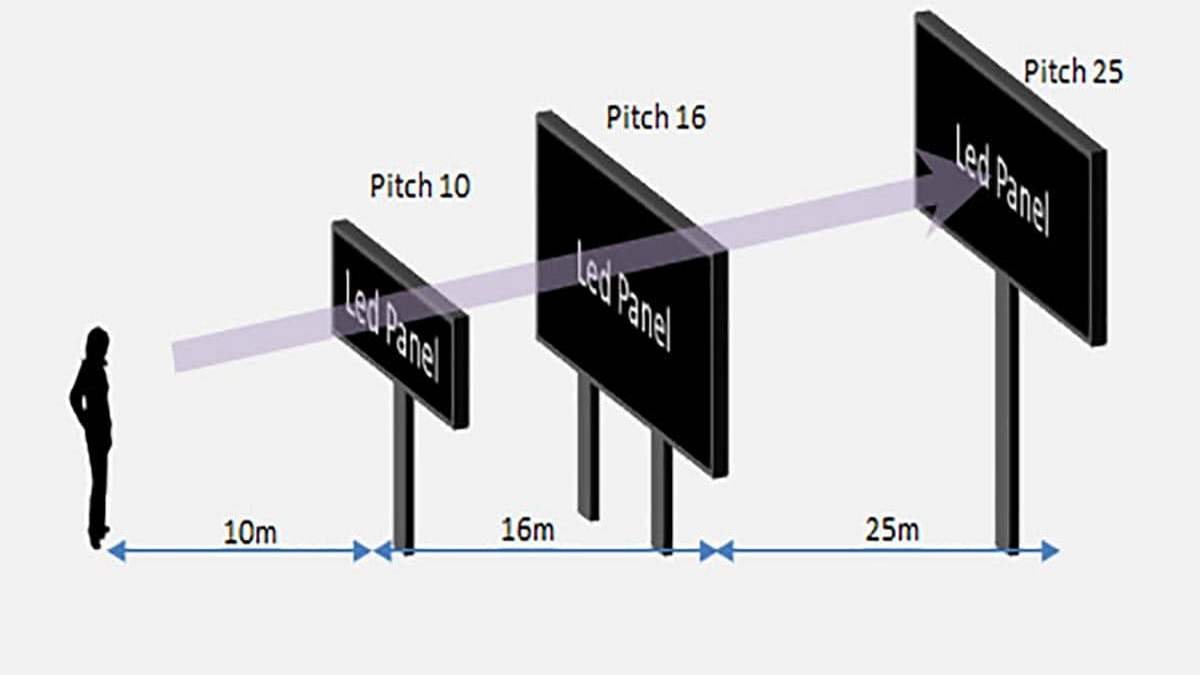
A primary rule of thumb for LED video walls is that the optimal viewing distance (in meters) is approximately 2 to 3 times the pixel pitch (in mm). For example, a 2 mm pixel pitch may deliver good clarity starting from 4 to 6 meters away. Some sources cite a more conservative “visual acuity distance” formula or the 10× rule (in feet) as rough heuristics.
Planar’s documentation shows a table correlating pixel pitches (from 0.6 mm to 10 mm) and comfortable viewing distances: for example, P1.5 corresponds to ~2.58 m comfortable viewing, while P10 corresponds to ~17.19 m.
Thus, when choosing the right pixel pitch for LED video walls, your first step should be estimating how close viewers will get to the display, then selecting a pitch that ensures a seamless image at that distance.
Here’s a simplified view:
| Pixel Pitch (mm) | Suggested Minimum Viewing Distance* |
| 0.6–1.5 mm | ~1–4 m (very close environments) |
| 2.0–3.5 mm | ~4–10 m (meeting rooms, lobbies) |
| 4.0–6.0 mm | ~10–20 m (auditoriums, retail façades) |
| 7.0+ mm |
~20 m+ (stadiums, billboards)
|
These are guidelines; actual acceptable clarity depends on content and human visual acuity.
![]()
Key Factors to Consider When Choosing Pixel Pitch
When making this decision, keep in mind multiple interlocking factors. Below are the most important.
1. Viewing Distance and Audience Behavior
As already noted, how far the audience will be from the display is the primary driver. If people will approach the screen (e.g. in a museum or retail space), you need a finer pitch. If the main viewing is from afar (e.g. billboard along a highway), a larger pitch is sufficient and more cost-effective.
Additionally, consider the distribution of viewer positions. In many real-world setups, not everyone will view from the “ideal” location; the edges or side seats might be farther or at oblique angles. You may need to over-specify slightly to ensure acceptable quality even in less ideal positions.
2. Content Type and Resolution Requirements
If your content includes fine detail — small text, charts, maps, or intricate graphics — you need a smaller pixel pitch to preserve legibility. Conversely, if your content is large-scale video, branding, or moving visuals (e.g. for concerts, advertising), you can tolerate a coarser pitch as long as the motion and general shapes appear crisp.
A mismatch between the content resolution and the display’s pixel density will negate any benefit of a tighter pitch. Low-quality input content being displayed on a super fine-pitch panel still may look unattractive.
3. Indoor vs. Outdoor Applications
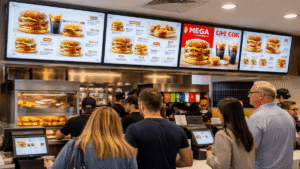
Indoor environments generally demand finer pixel pitches, since viewers are closer and ambient lighting is lower. For indoor LED walls in boardrooms, retail centers, or broadcast studios, pitches in the 1.0–3.5 mm range are common.
Outdoor installations, on the other hand, often rely on larger pitches (5 mm, 10 mm, or more). Outdoor displays also require high brightness, weatherproofing, and sometimes structural strength; a coarser pitch reduces the LED density, thus lowering cost and easing heat and power challenges.
4. Budget and Cost Trade-offs
Fine-pitch LED panels are substantially more expensive, partly because they require more LEDs, more precise manufacturing, and often more rigorous calibration. Operational costs (power, cooling, maintenance) also rise with density.
Thus, a key discipline in choosing the right pixel pitch for LED video walls is balancing desired clarity with what is economically justifiable for your project’s ROI.
5. Panel Size, Module Dimensions, and Optical Constraints
The physical dimensions of LED modules or cabinets can impose limits on the smallest feasible pitch. Tolerances increase as pitch shrinks. Also, as pixel density increases, heat dissipation and signal routing become more challenging.
In some cases, the architectural space or sightlines may limit how large you can make the display; sometimes the only way to increase clarity is to reduce pitch (if module size is fixed). Hence you must plan holistic integration — mechanical, thermal, electrical — along with optical performance.
6. Ambient Light, Brightness & Contrast
Particularly for outdoor or bright indoor environments, display brightness becomes crucial. Even with perfect pitch, if the brightness is insufficient to compete with sunlight or bright ambient light, the image may be washed out. Coarser pitches allow for larger LEDs and more powerful optics, which helps maintain brightness. So brightness and pixel pitch decisions often go hand in hand.
Practical Ranges & Use Cases
Below are typical ranges and use cases to guide your decision when choosing the right pixel pitch for LED video walls.
-
Ultra-fine (≤ 1.5 mm): Suited for studio walls, command/control rooms, luxury retail, or settings requiring up-close viewing detail.
-
Fine (1.5 – 3.0 mm): Common in corporate lobbies, exhibition halls, office signage, digital publishing walls.
-
Mid-range (3.0 – 6.0 mm): Good for arena walls, transportation hubs, auditorium back walls.
-
Coarse (6.0 mm+): Ideal for outdoor advertising, stadium scoreboards, highway-facing billboards.
For corporate environments, fine pixel pitches (around 1.5–3.0 mm) are popular because they balance close viewing needs with professional aesthetics. Many integrators even reference Office Digital Signage Specs when determining the correct size, brightness, and resolution for lobby video walls or boardroom installations. Aligning pixel pitch with those specifications ensures consistency with broader workplace AV standards.
Step-by-Step Decision Workflow
Here’s a systematic approach to help you decide:
-
Define your viewing geometry: map out viewer positions and closest likely distances.
-
Specify content goals: decide if you will be showing text, detailed graphics, or only big visuals/video.
-
Estimate budget constraints: set a ceiling on panel cost, operation, maintenance.
-
Compute candidate pitch values: using rules-of-thumb (2-3× pitch, 10× rule, visual acuity formulas).
-
Evaluate brightness & contrast needs: ensure your pitch allows adequate LED size and power to combat ambient light.
-
Mock test: simulate (using render or prototype) how your content looks at target distances.
-
Adjust for practical considerations: module availability, installation tolerances, future scalability.
By following this workflow, you can optimize between visual quality and cost – ensuring your installation is neither over-engineered nor under-performing.
Advanced Topics & Emerging Trends
 Integration with Other Display Technologies
While LED video walls dominate large-format visual displays, it’s useful to understand adjacent display technologies to contextualize decisions.
-
MiniLED vs OLED: MiniLED uses dense arrays of smaller LEDs as backlights for LCD panels, offering high contrast and local dimming advantages. OLED (organic light-emitting diode) panels are excellent for deep blacks and wide viewing angles but may not scale well for ultra-large outdoor walls. When comparing or complementing LED video walls with these technologies, you must consider contrast, brightness, cost, and lifetime. By understanding how MiniLED vs OLED behave, you can determine when an LED wall is the more appropriate solution and where hybrid or auxiliary screens might fit.
-
Micro LED Displays: MicroLED is an emerging technology combining the best of LEDs and OLED-like pixel control. Unlike large pixel-pitch LED walls, microLED panels can scale fine pixel densities across expansive formats. As those technologies mature, they may shift the lower bound of what “fine pitch” means for large walls. In future, some installations may integrate microLED walls for extremely close viewing zones, then use larger pixel-pitch LED for distant views. Embedding a microLED “window” zone inside a larger LED façade could become viable. Wikipedia
These hybrid approaches may influence your pixel-pitch choice, especially in future-proof installations.
Environmental & Operational Considerations
Cooling, Heat & Efficiency
The denser the LEDs, the more heat is generated in a given panel area. Effective thermal design (heat sinks, ventilation, airflow) becomes more critical. Operational power consumption also tends to increase with denser pitch, because more LEDs are lit and more driving current is required.
Durability in Harsh Conditions
Outdoor installations must survive temperature extremes, humidity, UV exposure, and possible vandalism. When choosing the right pixel pitch for LED video walls outdoors, you should also evaluate how well the panels resist thermal expansion, moisture ingress, and component thermal drift. Larger-pitch modules tend to have more tolerance for harsh conditions, which is another reason they remain popular outdoors.
Protecting Outdoor LED Screen from Extreme Heat
One special concern is protecting outdoor LED screen from extreme heat. In very hot climates, high ambient temperatures can degrade LED lifetime, cause color shifts, and reduce brightness. To mitigate this, manufacturers may add active cooling, thermally conductive frames, or ventilation. When your region is hot, selecting a slightly coarser pixel pitch may relax the heat density and reduce risk. Moreover, installing sunshades or selective coatings can also help reduce thermal load. In sum, thermal resilience must be part of your pixel pitch decision in warm climates.
Common Mistakes & Pitfalls
-
Over-specifying pitch: Some buyers assume “smaller is always better” and choose ultra-fine pitch even when viewers won’t benefit. This leads to excessive cost with no perceptible visual gain.
-
Underestimating viewing distance variation: People may move closer than expected; ensure clarity even at shorter distances or restrict access zones.
-
Ignoring ambient light challenges: A display may look perfect in simulation, yet fail under bright sunny conditions. Always test under real lighting.
-
Skipping content quality alignment: Feeding low-resolution content to a tight pitch display can look worse than matching pitch to input.
-
Overlooking long-term serviceability: Fine pitch displays may require more frequent maintenance, more replacement parts, and more calibration over time.
Sample Use-Case Scenarios
Scenario A: Corporate Lobby LED Wall
-
Closest viewer distance: ~4 m
-
Content: small text, brand graphics
-
Budget: medium
-
Recommendation: P2.0 to P3.0 pitch
-
Rationale: gives crisp visuals up close without excessive cost.
Scenario B: Outdoor Retail Façade
-
Pedestrian walking distance ~15–25 m
-
Content: animations, branding, large visuals
-
Budget: moderate
-
Recommendation: P6 to P8 pitch
-
Rationale: fine enough for clarity at 20 m, but reduces LED density and cost.
Scenario C: Stadium Exterior Billboard
-
Viewer distance: 30–50 m+
-
Content: full-motion video, scoreboards
-
Budget: large
-
Recommendation: P10 to P16+, depending on brightness and size
-
Rationale: coarse pitch suffices at that distance; maximizing cost efficiency.
Checklist Summary for Choosing Pixel Pitch
-
Map viewing distances and audience positions
-
Define content complexity and detail demands
-
Determine brightness and ambient light requirements
-
Evaluate power, heat, mechanical constraints
-
Estimate cost envelope and operational budget
-
Simulate or prototype visual results
-
Factor in environmental resilience (heat, humidity, etc.)
-
Plan for service, modular replacement, calibration
By executing this checklist, you converge toward the optimal pitch for your project.
Final Thoughts & Best Practice Recommendations
Choosing the right pixel pitch isn’t merely a technical exercise; it’s about balancing visual experience, cost, operational performance, and longevity. A well-chosen pitch can deliver immersive clarity without overspending; a misstep can lead to wasted budget or dissatisfied viewers.
-
Always start with viewer vantage geometry.
-
Let content type guide how fine your pitch needs to be.
-
Do not blindly chase the smallest pitch — only use it when justified.
-
Consider environmental and thermal factors, especially outdoors.
-
Simulate, prototype, or field test before full deployment.
-
Leave some margin for future-proofing or upgrades.
In short: invest in choosing the right pixel pitch for LED video walls as a core part of your planning — it will pay off in performance, cost control, and audience satisfaction.